
How to Shade Like a Pro – Beginner’s Step-by-Step Practice Guide
Started drawing, but do not get the “art” vibes from your works? Worry not, as you are not the only one to feel that way when just starting out. Just read this complete guide to understand how to shade and give your childlike drawings the artistic touch.
The thing that makes a drawing a piece of art, is perspective. Yes, the subjective perspective too; what you perceive of its motive, the idea behind it, and its meaning. But here, I am talking about the visual perspective. And the best way to add perspective is by assuming a source of light and shadows near the object being painted.
Light is as important in art as it is in real life. In real life, you cannot see anything without light. In art, the object is just a two-dimensional lifeless combination of lines. This is the 3d perspective added to the art piece that makes it worth appreciating.
And the best way to add perspective to a piece of art as a beginner is by shading. So, let’s get started!
What is Shading?
Shading is the enchanting art of adding different tones and values to an artwork or image to create the illusion of depth, dimension, and form. It’s like a dance of light and shadow that brings life to the flat, two-dimensional artwork. It lets the viewer understand the “view” of the object. This light can be assumed to be hitting the object from any direction, and shading is done accordingly.
Shading can be accomplished using various artistic techniques, depending on the medium you’re working with. For example, in pencil drawings or charcoal sketches, you can use hatching and cross-hatching to create shadows and gradients and blend them to get realistic results. Layering lines in different directions and densities can produce varying levels of darkness and texture.
Why is Shading Important?
To understand this, draw a sphere. Done? Now look again, is it a sphere or a circle? What you drew is just a line drawn in a circular path. One simple reason why it is not a sphere is because it lacks “depth”.
Shading adds depth and emotion to your artwork. It isn’t just about making things look pretty; it’s about creating an atmosphere, setting the mood, and guiding the audience’s emotions. Imagine a scene with bright, cheerful lighting versus a scene with dark, moody shadows. The former might make you feel warm and happy, while the latter could instill a sense of mystery or even fear.
In art and visual storytelling, shading can enhance the characters’ expressions, making them more relatable and human. It brings out subtle nuances in their emotions, allowing the audience to connect with them on a deeper level. When the hero triumphs, you’ll notice how the lighting triumphs with them, making the victory even more satisfying. And when the villain lurks in the shadows, you can practically feel the tension rising.
Here is an example of what proper shading looks like for a realistic drawing:

Important Points to Remember
Before picking up the pencil, remember these important points that will help you draw better and more effectively.
- The first thing to always keep in mind while shading is that even if you are drawing something fictional, there “must” be a light source through which the person is able to see it. Now think of points where that light is hitting the object and reflecting back.
- Those points of hitting and reflection depend entirely on the position of the source of light. So, the position of the light source directly controls the angles and perspective your objects will have.
- The shading is minimum near the point where light is hitting or reflecting, and it gets darker as we move away.
- The back and forth shading technique. This technique is as simple as its name. You just move your pencil back and forth in one plane while keeping it dark. And slide it in another plane while gradually lowering the pressure, hence the darkness.
In case of a sphere, this back and forth shading technique produces 5 shading zones. It’s better to learn about those zones or elements before starting practice.
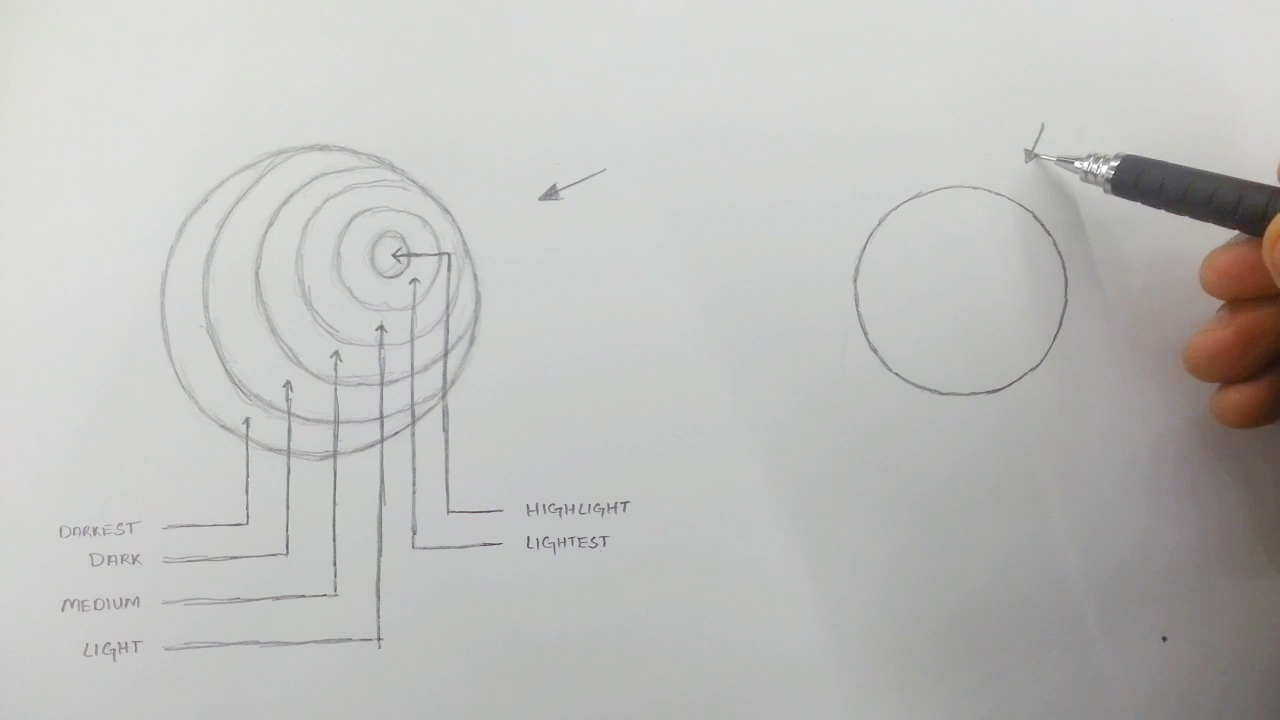
Elements of Shading
Elements of shading are specific zones based on their degree and distance from the center point, called highlights. The highlight is the area of direct reflection of light and hence the brightest. So bright that you do not really need to shade it at all, depicting that you can see the light directly hitting it.
Knowing about those zones can be regarded as theoretic learning, but it sure will help you better understand the concept of shading and practice it.

The 5 elements or zones of shading are as follows
Lightest
This area is adjacent to the highlight and receives a little less light. Hence, it is shaded very little to mark its difference from the point of direct reflection of light.
Light
This zone is next to the lightest shading zone, and here the shading is light. Light shading depicts that lesser and lesser right is reaching as we move farther from the highlight.
Medium
Medium is the area of equal presence of light and shade, and hence is also called a gray area.
Dark
This is the area where darkness takes over the light. The shade is dark here to show that we are finally at so much distance from the highlight that light cannot reach here.
Darkest
It is better to draw the sphere to be shaded alongside this picture as it will help you visualize the areas as to which zone needs to be shaded to what degree.
Tools Needed
You’ll need the following tools to shade
- 4B Dark Pencil
- Mechanical pencil (with 2mm HB leads) for shading
- Blending Brush
How to shade: Example exercise for shading
Well, enough talk, how do we do it? It is relatively simple as compared to the purpose it serves. The best way to learn how to shade is by first practicing it on a sphere, as it covers all the 5 elements of shading. It is better to practice it alongside as I show you how to do it. So, roll up your sleeves and starts drawing along with us by following these simple steps
Step 1
Firstly, draw a circle. It is better if you draw it by hand. It’s completely okay if you do not get it right on the first try, or even the first ten tries. Just keep practicing until you get it. Once you’ve drawn it well enough, move to the next step.

Step 2
Now assume the position of your source of light. The entire shading on the sphere will depend upon the position of the light source. And keep the source still during the whole process, meaning that you cannot start shading in another direction midway.
Step 3
Now locate the highlight according to the assumed light source. This is never on the brink of 2d shape, but at a little distance from the boundary. In the case of a sphere, if the light source of on the top right, then the highlight will be a little lower than the top right position of the sphere. It gives a realistic touch to the art.
Step 4
Now start from the boundary of the sphere, using the back and forth shading technique, and move towards the lightest zone while slightly reducing the pressure.

Move closer to the highlight according to its shape. Since the highlight is circular here, move towards it from all directions. After this, blend the whole shading in the ball to make it look uniform and not a bunch of back and forth lines.

Step 5
Once you’ve covered all the zones as per their degree of darkness. Then make it a little uniform by looking at the gaps and overly darkened areas.

Then use a 4B dark pencil to give a complete look to the darkest zone. With this, the shading part on the sphere is done, but it is yet to finish.
Step 6
Using the same 4B pencil, add a shadow of the object. Since the assumed light source was in the top right position, the shadow will be on the opposite, lower left side. Add the shadow, projecting from the ball, by applying very slight pressure on the pencil. The shape of the shadow of a sphere is the same as a sphere. So, just draw a circle and do slight shading as done on the sphere itself.
Here, the elements of shading on a shadow are not the same as a sphere’s. The point closest to the object is the darkest, and it gets lighter as we move away from the object. Apply the same formula to the pressure of the pencil while shading.
Also, the boundary of shadows is rarely precise. Make them very blurry to depict randomness. If you make them too accurate, the focus might move away from the object to the shadow.

Step 7
Now, use a blending brush to smoothen the shadow. It gives a uniform and final touch to your art piece.
This was all about shading the sphere. All other things, like the cheek, eye, and face resemble the sphere in some way. So, practicing shading on a sphere is the best way for you to master shading on many other objects.
If you are more of a seeing and learning person, then you can see this awesome tutorial on YouTube that teaches how to shade as a beginner. For now, just practice, because that is what’s going to make you a master on this artventure.


